Monday, September 27, 2010

Family Pics


We headed to Rigby lake last week and tried out my remote to my camera that Chris got me for Christmas last year. Pretty handy! Unfortunately it was too late so everything is a bit flashed out. So we might just have to do another "session" I don't think Chris will be too thrilled. I can't get over how good jake is to take pictures.

Friday, September 10, 2010

Feeling Fair

So the fair is in town. I love fair food. LOVE it. But not so much anything else. The crowds, the nastiness. I think that means I'm becoming an old man. So we opted out this year and decided instead to make our own fair food of sorts. Funnel cake with freshly picked raspberries and whipped cream.


Funnel Cake

Ingredients:

1 egg
2/3 cup milk
2 Tablespoons sugar
1 1/4 cup flour
1/4 teaspoon salt
1 teaspoon baking powder


Funnel Cake Directions:


1. In a deep skillet, heat about two cups of oil over medium-high heat until hot. Test the temperature by dropping a pinch of flour into the hot oil. If it sizzles right away without smoking, it's perfect.

2. Beat egg and milk. Mix all other ingredients in a separate bowl and slowly add to the egg mixture, beating until smooth.

3. Using a funnel, drop into hot oil working from center outwards in a web pattern. (You can use a gallon sized freezer bag instead of a funnel by pouring the batter into the bag, snipping off a small corner of it, and squeezing the batter into the oil.)

4. Cook for about 2-3 minutes, remove from the oil when golden brown and crispy.

5. Sprinkle with powdered sugar and serve. (courtesy of www.momswhothink.com)


It was easy and delish! I think next time I might add a bit more milk, as it was a little dense. A perfect very-bad-for-you little treat to remind you of the fair! Now if only I had a nice big cob of corn.

Wednesday, September 8, 2010

What's up.

Here's a photo of one of the shoots I did this week. For the last few months I've only been taking referrals, but I've decided to start advertising again. I really love photography, but I get frustrated with people who don't take it as seriously as I do and I get a little frustrated not having the best equipment too. But when I get a few of those great pics it's the best feeling! It's like capturing something as close to perfect as it can get.

Tuesday, September 7, 2010

{Claire's Room} finished?!?


Well I finally got most everything finished in her room. I am still planning on doing some stenciling, but I think it's pretty much done for now! I settled on a light green and I really like it! I had to paint every square inch of wall, ceiling and trim. Talk about a project!


My Granny Boehme gave Claire this adorable Hummel plate with fairies that match her bedding perfectly.


We also created a display board for her to put up her latest artwork. Up right now is me, Dora, and a tiny Ariel. Can you tell which is which?


I got this cute little chandelier at Ikea and I think I am going to spray paint it white.


Also from Ikea is the easel. Hilary (the good aunt--and most favorite:) and Ella gave her that for Christmas.


Now I just need to get working on Jake's room. I have done NOTHING to it, not even touched up paint. I am thinking cowboy theme, but I need ideas. Anyone??

Friday, September 3, 2010

Cooking Day 2


Fresh Homemade Ricotta Gourmet

2 quarts whole milk
1 cup heavy cream
1/2 teaspoon salt
3 tablespoons fresh lemon juice


Place cheesecloth over a large bowl.
Slowly bring milk, cream, and salt to a rolling boil in a 6-quart heavy pot over moderate heat, stirring occasionally to prevent scorching. Add lemon juice, then reduce heat to low and simmer, stirring constantly, until the mixture curdles, about 2 minutes.
Pour the mixture into the lined sieve and let it drain 1 hour. After discarding the liquid, chill the ricotta, covered; it will keep in the refrigerator 2 days.


I actually used my homemade buttermilk, along with regular milk and for my acid I used vinegar instead of lemon juice.

Fabulous French Bread


I got this delicious recipe from a blog I follow- Utah Deal Diva. This is her photo, I think she got this recipe from another blog entitled Jamie Cooks it Up. So if I haven't plagiarized one, I'm sure the other! But I have to say that it turned out just as good and I've made it a few times since. I think it's become one of my favorite recipes!

Yield: 3 loaves
1 TBSP shortening
1 TBSP coarse salt {or 1/2 TBSP regular salt}
2 TBSP sugar
1 cup boiling water
1 cup cold water
1/3 cup lukewarm water
1 TBSP yeast
5 - 6 cups white all purpose flour {I used bread flour}
2 rounded TBSP dough enhancer {my addition}
1 egg


Step 1: Place the 1 cup hot water in the microwave for 3 minutes to get it boiling.

Step 2: Dissolve the yeast into the warm water. Stir it around until it is all mixed.

Step 3: Combine the salt, shortening, and sugar in the bottom of your mixer with a fork. The dough hook doesn't work very well. You need to smash up the mixture until it resembles the picture above. {I used my whisk attachment on high. It took about a minute and was perfect.}

Step 4: Pour the boiling water over the shortening mixture. Mix slightly to combine.

Step 5: Pour the cold water in next.

Step 6: Then pour the warm water and yeast into the mixer.

Step 7: Begin to add the flour, one cup at a time, until the dough pulls away from the side of your mixer. Add the dough enhancer at this time, along with the flour. The dough should be balmy but not sticky.

Step 8: Let the dough mix on high for 8 minutes.

Step 9: Let the dough rise in the mixer for about 20 minutes. {This step can actually be skipped if you are in a hurry, but I recommend it as it allows the dough the chance to rest and improves the flavor and texture.}

Step 10: Separate the dough into three parts and place on a large jelly roll pan sprayed with cooking spray. Let the dough sit for about 5 minutes. Letting it sit will make it MUCH easier to shape.

Step 11: Spread the dough out with your hands. Stretch it slightly until you have an oval about 1" in thickness. Roll the dough up into a log shape. Take the ends of the log and fold them into the middle, with the ends touching. Turn the loaf seam-side down onto a greased pan. I used my french bread pans, but you could also use a jelly roll pan. Repeat with remaining dough.

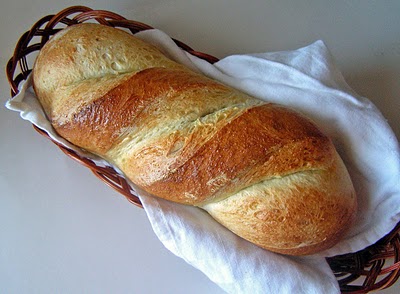
Step 12: Using a sharp knife, quickly cut 3 diagonal slits into the top of each loaf.

Step 13: Whisk egg until frothy. Cover loaves with egg wash, making sure to get in each slit.

Step 14: Place the loaves in a warm 170 degree oven and let rise for about 15 minutes.

Step 15: Turn the oven up to 400 degrees and re-set your timer for 15 minutes. {Leave the loaves in while the oven increases in temperature.}

Step 16: Turn the oven down to 350 degrees and turn the pan around in the oven. Bake for another 10-12 minutes, until the loaves are a nice golden brown.

Enjoy!